電池式の、省エネ版の回路検討してみました。
今回は、esp8266の
Depp Sleepモード (10 μA )を利用してみます。
Modem-Sleep / Light-Sleep より、大幅に消費電力が低いようです。
電源: 単三 充電池の3本
動作概要:
1) 起動
2)センサ値測定、クラウド送信。
3) deep Sleep( スリープ処理 )
の繰り返し。電池残量が既定の電圧より下がると停止。
# 回路、Deep Sleep用
16番( IO16), RST を結線しておきます。
*) その他は、通常(スリープなし) と同様。
投入電源は、ニッケル水素 電池 3.6V (1.2 * 3) を、レギュレータで
3.3 V まで下げます。
# おまけ, テスト用の電池(単三×3)
今回は安価な、充電池を使用しました。
充電池:1.2V ニッケル水素
100均(ダイソーさま)で購入 , 各1本: 108円(税込み)
テストなどで、大目に使う場合も安価で助かります。
 # ドライバ
ビルド:
ESP8266 Arduino core : 2.2.0
Arduino IDE: 1.6.5
DHT11 の場合、
Depp Sleep復帰時に、センサ取得失敗がありましたので
Loop内でリトライする仕様としています。
*) 当初は setup内で全て実装する予定でした。
==== update 2016/09/01 ====
DHT11センサで、Deep Sleep復帰時の測定時で
バラツキの大きい場合がありました。修正版で
N回連続測定、平均値計算処理を追加。
https://gist.github.com/kuc-arc-f/6ac62375066d4fc541ae56ee80138515
# まとめ
電力消費のテスト状況については、進展を更新したいと思います。
スリープ復帰時の、ルータ接続までの時間はバラツキがある感じでした、
スリープ間隔=10分 (600 sec)の場合、
実行時間。起動から、
1) ルータ接続、3 - 5 sec
2) センサ測定。HTTP送信 0.5 - 1.5 sec
小計 (1サイクル)= 4 -7sec
# 謝辞と、お礼
今回も多くのブログ記事、ライブラリ等参考にさせて頂きました。
感謝申し上げます。
http://qiita.com/exabugs/items/9edf9e2ba8f69800e4c5
# 関連のまとめ
IoT な電子工作まとめ
http://knaka0209.blogspot.jp/2015/11/iot-matome.html
========== update 2016/08/27 ==========
# 連続稼動時間の消費電力測定(途中経過)
電圧測定方法:テスタで、各電池1本ごとに手動測定。
# 2016/08/27更新
テスト5日目ですが、
約108 Hで、
昨年のスリープ無しテストの約7時間を大幅に超えて稼動中です。
*) 初期の、1本当たりの電圧が、メーカ表示値より少し超えていますが。
誤差の範囲としています。

========== update 2016/09/02 ==========
# 2016/09/02更新
連続稼動テスト 12日目 (約280H) で、
稼動中です。
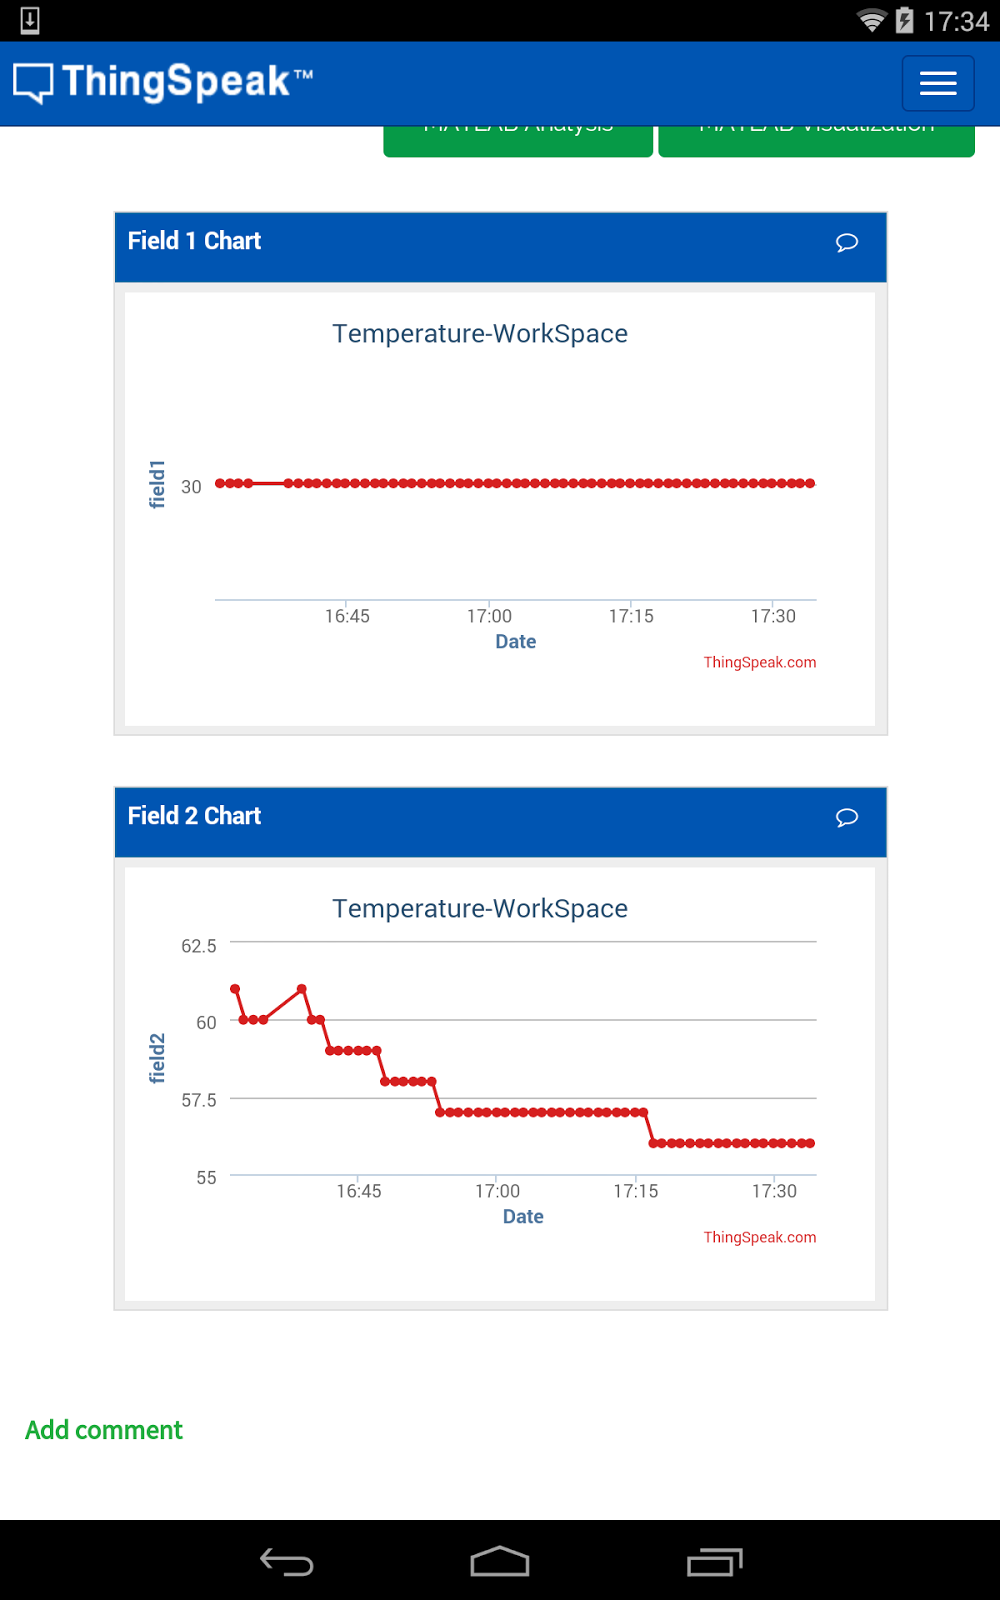
# 電圧測定結果と、温湿ログ

==========
update 2016/09/09 ==========
# [最終] 2016/09/09 更新
10分間隔( 600Sec )スリープ版
連続稼動テスト 18日 (約 410H) で停止しました。

# 終盤のログ

*) 安価の充電池で、スリープ間隔が短めに設定した関係もあり。
予想より、短時間で電力不足となりました。
次の条件の変更等でのテスト企画したいと思います。